I was so taken by Jane's Lyra (actually Neibling's Lyra, but Jane alerted me to the pattern's existence, so she gets my credit), that I dug out the magazine and some black Zephyr to swatch it. I was astounded that the pattern has lain, dust-covered, for years amidst a large stack of Anna magazines. I subscribed to Anna a long time ago when I was in my sweater phase and, after 10 years of staring at ugly sweaters, I stopped my subscription.
After I saw Jane's post, I unearthed them from underneath a pile of old notebooks and nearly fainted with delight. They are FULL of Neibling designs. I found about 20 of them, including the gorgeous Lyra design.
I am a disaster with a crochet hook and DPN's are not my favorite,* so I spent an hour inventing a nice, simple way to begin circular shawls.
This is picture-intensive and I hope I can explain it so everyone can give it a try.
Basically, you make a loop and knit into it. When you have the correct number of stitches, you can arrange them on either DPNs or, as I did, two circulars and start knitting. After a few rows, or whenever you feel like it, you just pull on the end to close the circle.
Aside from not having to find or use a crochet hook, tatting shuttle, or any other esoteric object, the advantage of this method is that you can make the central loop nice and large. Doing so makes it easier to manipulate the multiple needles you need for circular beginnings.
I have never seen this method anywhere, but if someone else invented it already, my apologies for restating your elegant technique.
Here we go:
Flop the yarn over your hand thusly:
Flip your hand over...
...And make a loop.
Insert the needle into the loop..
...And bring the yarn over the top. One stitch made.
Now go under the needle and wrap the yarn for the second stitch.
And then over...
..and under as many times as you need stitches. End by going under, not over. You'll see why when you start to knit. The exact number isn't important, because you can slip off the excess stitch(es) later.
Start knitting. I use two circs, but DPN fans can begin juggling their needles of choice:
Here I am starting the second circ.
And I am at the end of the round, ready to start the second one.
Three rounds finished.
Pull on the end of the yarn to close the hole.
I love those 99-cent bamboo needles, too!
*I loathe, hate, and detest DPNs.
Thursday, August 16, 2007
Simple Ring Beginning for Circular Shawls

Friday, December 29, 2006
Fleegle's Totally Stretchy and/or Provisional Cast-On
If you've been reading other posts, you've probably picked up on the fact that I am the world's laziest knitter. Being lazy and curious has it's advantages, in that I am constantly looking for new ways to save time, energy, and brain power.
I've been fascinated by the methods of provisional cast-ons that I've read about, as well as the intense discussions of the stretchiest cast-on. Most of the former revolve around crochet hooks, extra threads, unpicking same, carefully scroonching stitches onto needles, and so on. And the latter, well, suffice it to say that I know perfectly well how to do all the exotic methods, but why bother? Of course I have another option for you that encompasses both provisional and stretchy. And it couldn't be easier.
Take your knitting needle (any kind) and a circular needle with a nice cable. Make a slip knot and put them together thusly.
Wrap the yarn around both the needle and the cable for the number of stitches you need, plus some extra wraps.
I can't give you an exact number here, but for 20 stitches, I wrap an extra 5 times, for 100 I wrap an extra 20. The wraps get sort of messy at the end, so I just make some extra. As this cast-on takes less than a minute for 100 wraps, it really doesn't matter, because you will drop the excess at the end.
Turn the needle over so the thread is coming from right to left. Start knitting.
Keep knitting until you have the correct number of stitches.
Unwind the excess. Drop the slip knot if you want. Whatever.
Now, at this point, your provisional stitches are on the cable of the circular needle. I happen to like to use KnitPicks cables and screw on their needle cap thingies. But you can leave your stitches on the circular needle--make sure you do put some sort of cap on the end so the stitches don't fall off.
Turn the work around as usual and continue knitting away. Here is the second row half-done.
That's it. When you are ready to do whatever with your provisional stitches, you can: Turn the work upside down and knit the other end if you are starting from the center, attach your lace edging, or do some grafting.
Now I hear shrieks of WHAT ABOUT THIS STRETCHY CAST-ON YOU PROMISED??
Oh. Well. Turn the work upside down and do Elizabeth Zimmerman's Sewn Cast-Off on the stitches currently resting on the cable. Great for socks. Great for lace. If you use the sewn cast-off method to end your piece, well, both sides now match, don't they?
Elizabeth Zimmermann's Sewn Cast off from Knitting Without Tears.
Break yarn, leaving a tail about 4 times as long as the circumference of the edge. Thread a tapestry needle.
* sew forward (right to left) through two stitches as if to purl, leave the stitches on. Sew backward (left to right) through one stitch as if to knit and remove the stitch.
Repeat from * until you run out of stitches. Work in tail on the inside of the knitting and trim any excess.
Saturday, December 15, 2007
Yarnival, December 15, 2007
Some Yarnivals have themes, but I couldn't come up with brilliant, cohesive topic. Consequently, this Yarnival is basically a little bag of stocking stuffers. I had a wonderful time compiling these entries, and I do hope you have an equally entertaining time reading them.
I read this incredible story a few months ago, and still can’t believe that anyone could be so driven to produce the perfect, complete, set of Hybrid Mutant Ninja Interchangeable Knitting Needles. I am profoundly envious--my father was a man of many talents, but he had trouble differentiating one end of a screwdriver from the other.
Like many knitters, I tend to scratch directions, tips, and modifications into a little notebook, where they promptly lose themselves amidst a forest of similar scribblings. For those of us with less-than ideal note-making skills, Kathryn Ivy presents well-organized, handsome journal templates for both knitting and crochet.
One of the standard items in my knitting bag is a crochet hook—invaluable for picking up stitches, binding off, making picots and bobbles, and snaring little onions out of mixed drinks. Girl On The Rocks is never without one, thanks to her nifty keychain crochet hook.
Like sewing? Have a disorganized straight needle collection? Craftster shows you how to convert a used hardback book into a handsome needle holder. She used an old physics textbook and the results are unquestionably unique. The fact that you cheerfully tear the book apart makes me wish I had saved my much-despised organic chemistry text from college. Who knew?
Hate sewing? Have a disorganized circular needle collection? Check out pieknits’ no-sew circular needle holder. It’s cute and easy to rig from empty thread spools. Of course, if you hate sewing, you might not have any empty thread spools...
Like sewing? Need something to hold your knitting and all the other stuff you just made? UHandbag shows you how to make a pop-open/spring shut 14” tote with a useful little accessory pocket.
Photographing your work, be it proto-kitting, knitting, or a finished piece, can be difficult. A lightbox makes it a lot easier to take accurate pictures of your stuff. Professional light boxes are expensive, but LollyKnittingAround explains how to make a portable lightbox for less than $20.
A Few How-To's
The Experimental Knitter gives us a new, simple, elastic cast-on particularly appropriate for
Now that you've cast on, perhaps you want to embellish the fabric a bit. FluffyKnitterDeb’s wonderful beading tutorial shows you how to easily add beads with a crochet hook, so you don’t have to string trillions of little tiny beady things before you actually start knitting.
BadCat also has a wonderful beading tutorial on the same topic, complete with clear, easy-to-follow instructions.
If you have a teeny-tiny doily pattern you adore and want to see it Writ Really Large, The Doily Underground gives an exhaustive analysis of doily-to-afghan conversions.
Those who read my blog will understand that Harry, the Giant Knitting Spider, couldn't help but contribute a post about mending webs with yarn. Harry was also thrilled with Nina Katchadourian's Advertising Kit for Spiders, which allows him to integrate ads for karaoke machines and spicy cocktail onions (his favorite snack food) into his remarkably sloppy web.
Fiber Fool clearly spends a lot of time knitting socks, and she has written an excellent, detailed comparative review of eight popular sock yarns. The sample socks are a bit of eye-candy, too!
Want to recycle an old sweater? Neauveau tells you how here. Frogging can be fun, especially if you use your future ex's knitted clothing!
If you are bored at work (or anywhere, for that matter), you can indulge in a bit of Knitting Boggle, courtesy of The Purloined Letter.
Double Helix obviously spent a lot of time defining variations of the humble swatch. Her lexicon is hilarious.
There’s no pattern here, but as the wife of a retired police lieutenant, I did enjoy this bit of knitted eye-candy.
And finally, if you are getting older and grayer by the second, rejoice! Go Knit In Your Hat has designed the retirement community of your dreams: Purlin’ Acres. Please do not apply for a few months, while I work my application over. Frankly, I wouldn't mind moving there now.
Friday, December 1, 2006
The First and the Last
Starting a blog is a bit awkward, I mean, where do you really begin?
The first post was the much-requested no-hassle sock pattern, which was why I started the blog in the first place. I was tired of sending it out by email and private messages.
I am a book compositor by profession, and it just so happens that one of the books I am currently laying out is about blogs. It's one of the few books that I actually started reading (usually I just look at the layout and ignore the content). I had to stop compositing and finish reading, because the text was getting kinda raggedy.
But the book was so interesting that I began following the author's directions. I tried a few of his recommended blogging sites, and decided Blogger was the easiest to use.
I am sure that after a few months or so, the posts will die down to a trickle, but there is a good amount of backlog here, and many people have requested pictures and tutorials from me. So I set up my camera on a tripod, and will try to fill everyone's wish list (even Laura, who wants some pictures that belong in the late--and-much-lamented You Knit What!).
So, for the first real post, I present a wildly condensed knitting history, featuring only my earliest and latest finished objects.
I learned to knit when I was two years old. We lived in New York City and getting around in those days meant using the subway. Whenever my mother took me down into that appalling, noisy, black hole, I would start to scream. She, being an impatient person, decided that all the little brat needed was a distraction. So out came the knitting needles and some red yarn, and I apparently spent two years knitting a pot holder.
"Apparently," because no pot holder was ever produced that I could recall. About ten years ago I asked her about it, and she told me that she unravelled the darn thing after each knitting session, seeing as how (a) she had no use for a woolen potholder and (b) if I finished it, I'd probably start the screaming bit all over again.
At some point, we became affluent enough to take taxis, so the pot holder remains my first unfinished object. I have no desire to recreate it. RIP.
After that, we progressed to scarves (long since disintegrated) and other forgotten knitware. However, at the age of eight, I made my first sweater. I still have it and I still wear it, as she had me make it in a lady's size Small, so that I wouldn't outgrow it (all the women in my family are tiny).
Here it is:
Here;s a close-up--hard to believe that I was knitting with one color in each hand at that age.
And here's a close-up of the inside. Not bad, even 50 years later.
As she always was, she was correct about the sizing. It still fits, 50 years later. She purchased the yarn and pattern from a shop in Denmark. It was knitted entirely in the round up to the armholes on a ghastly circular needle, then the front and back were knit back and forth on even more ghastly straight needles. The shoulders were seamed and the sleeve stitches were picked up around the armholes and knitted down to the cuffs. A daring design for 1958, when almost everything was knitted flat and tediously seamed together.
I can still see her face when I cast off the last stitch and the sweater fell to the floor. Mother wasn't much on verbal expression, and her praise was rare. She picked up the sweater and turned it inside out, then showed me how to weave in the ends. Never did she block anything, so a little while later, I found myself outside in the snow wearing my brand-new sweater, which at that point, came down below my knees. Nice and warm.
When I came back inside, she had piles of Workbasket Magazine ready for me to choose my next project. I have no idea what it was, though. When I get around to going through my drawers, I will post pictures of some other antique FO's that I kept.
In the meantime, here is my latest FO: Little Devil Kissy Socks. The yarn is Lisa Souza's lucious Merino Sock Little Devil colorway. Pattern is the No-Hassle sock from the last post. DH (size 12) loves them and as worn them constantly for the last few weeks. I had to fish them out of the laundry bag to take a picture, so they look a bit rumpled.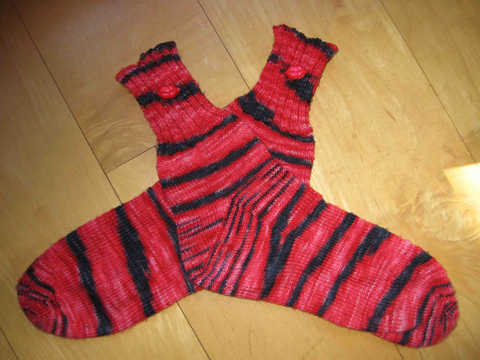
Close-up of the buttons: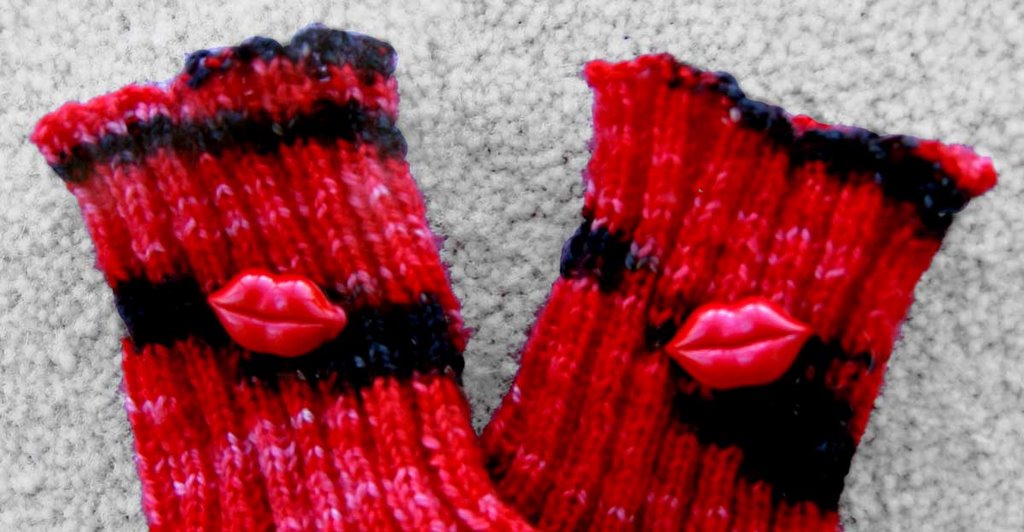
The buttons came from here:
http://www.craftconn.com/Main.asp?Task=Custom&Step=Notion+Category&StartAt=25&CategoryId=255.
The JHB buttons are just sweet. I bought some of the cheshire cats to use on a sweater that is currently almost in progress (still swatching).
The yarn is Lisa Souza's Alpaca Silk in the Wild Things colorway, also lucious. Lisa Lucious Souza, that's her. Check her out via the link in the sidebar on the right of this blog page.
Sometime during the next few weeks I will add lots of pictures to my sock tutorial. it's not so easy to take pictures of knitting-in-progress, so bear with me for a bit.
Thursday, February 28, 2008
A Normality Sweater
I love inventing ways to do things--the invention process is often so much more intriguing than actually knitting the object. Once I've worked out the principle, I find myself wishing for an apprentice who could just follow my notes so I don't actually have to knit the darn thing.
Alas, I have no apprentice (applications are being taken now!), so after figuring out how to work this sweet little sweater, I had to produce a finished object, otherwise nobody could figure out what I was babbling about.
What?
In this post, I will demonstrate the principles of sideways seamless construction, which can be applied to all sorts of useful and non-useful things--toys, hats, doorknob covers, whatever. Pithy directions follow all the picture stuff.
Why?
Sideways construction has several things to recommend it.
First of all, most people look, um, not so wonderful in horizontal stripes. But knitting a regulation sweater with vertical stripes is about as fun-filled as, say,sleeping on golf balls. Each stripe requires a different ball of yarn just waiting to tangle up with all the other balls of yarn dangling from the needle. If you forget to twist, you get a hole. Face it, you don't see a lot of striped intarsia sweaters. But knitting a vertically striped sweater sideways requires only that you change yarn color after each stripe. And you can decide on-the-fly just how wide you want the stripes to be.
Second, some types of yarn are inherently droopy--cotton and silk for example. Sideways construction can alleviate the tendency of these fibers to stretch and sag.
Thirdly, you can easily try on the sweater as you go along, as demonstrated by Larry in the accompanying picture essay.
And lastly, it's just fun to do things at a 90-degree angle. All sorts of interesting problems present themselves to be solved with incredible cleverness or brute force, depending on your attitude and and/or Clever Quotient.
So, onwards to the lesson.
How?
Here we have a perfectly normal little sleeve knitted in the round on two circular needles. Anyone who has knitted a tube will know how to do this. (If you don't, the Internet is full of information about this technique.) From this tiny acorn, we shall make a sweater grow.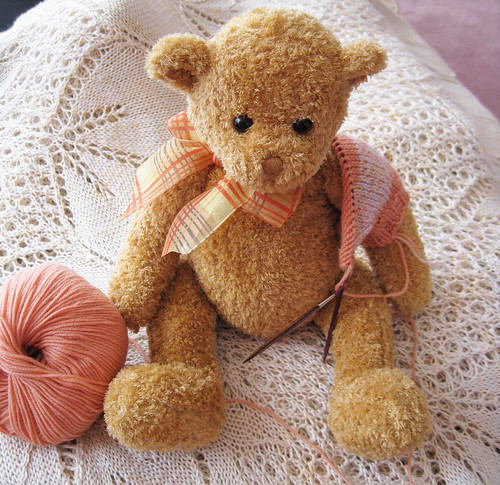
First, we cast on the stitches for the front and back using my beloved Turkish cast-on. This fancy and exotic name just means: Wrap the yarn around two needles--couldn't be simpler.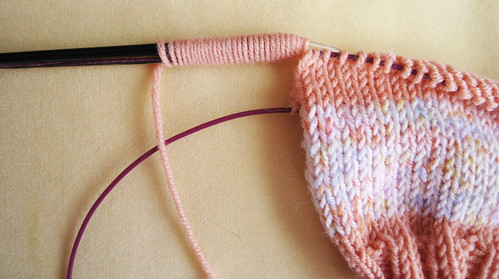
The yarn is at the bottom front of the sweater, so I turn the needles over so the knit (right side) of the garment is facing me and knit back. I am putting a moss stitch band at the bottom edge. Alternatively, you could knit the entire garment plain and pick up the stitches later for a ribbed bottom edge.
You have to be a bit careful here to pick up the correct needle to knit back. If you do it wrong, you'll find you will get up to the sleeve and suddenly, the purl size is facing you. Whoops--better start over.
The sleeve stitches are now shoulder stitches.
As I cruise over the shoulder, a lovely sight greets my eye, namely, all the back stitches just waiting for me to knit up.
And so I do. Now I am at the lower edge of the sweater back.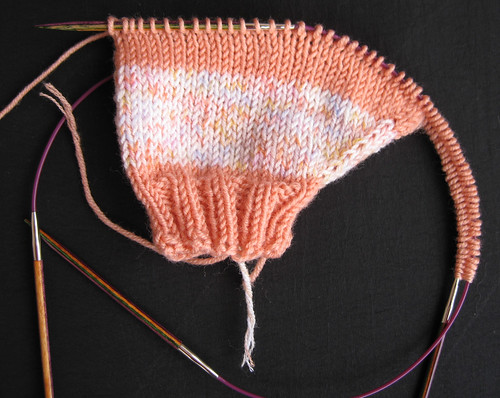
I turn, and purl back to the front again.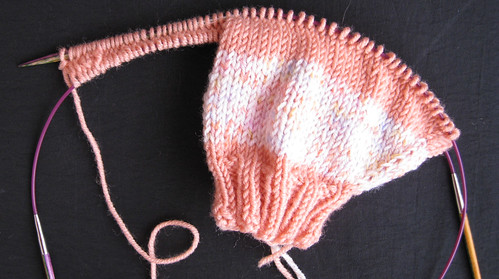
Basically, I am knitting a U-shaped object. The curve is the shoulder and the legs are the front and back sides. Here we are a bit further along.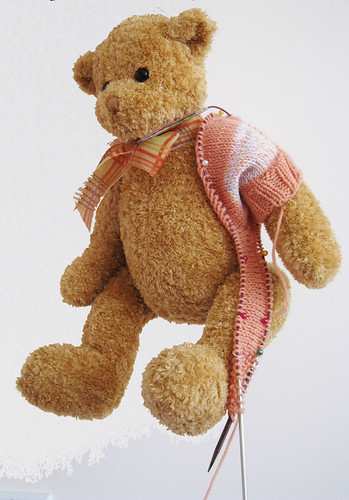
Continuing on, I finish the shoulder area. Here's a side view.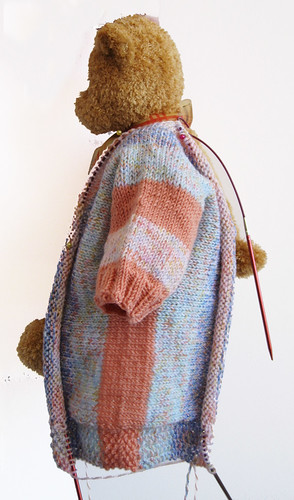
And then, the back and front must part ways for a while, because we do need a hole for the head. If you forget the hole, I suppose you could steek it, but that's way beyond my area of expertise. You are on your own if you decide to cut and sew.
For the neck area, instead of knitting back and forth over the entire garment, we shall knit the front back-and-forth and the back forth-and-back. Um. How about: The front and back are knitted separately to accommodate the neck area. The shapings are the same.
Once we have finished with the neck, the back and front have a joyous reunion at the shoulder.
When the second shoulder area is complete, I carefully isolate the sleeve stitches with markers because I tend to daydream and do stupid stuff like bind off the entire side, thus producing an inventive one-armed sweater. Do not ask me how I know this.
The yarn is at the bottom edge of the front. I turn the garment inside out and do a 3-needle bind-off up to the sleeve stitches.
And whipping out my trusty second circular, I finish off the second sleeve.
And finally, I pick up the neck stitches and do an inch of ribbing.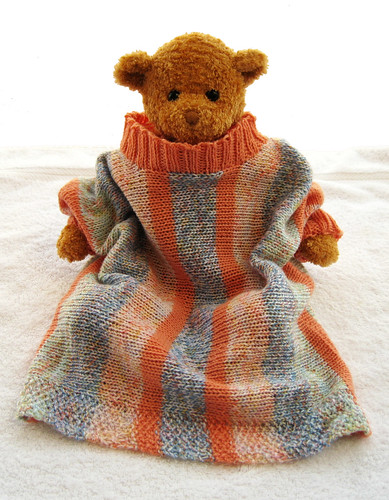
Here is the garment shown flat.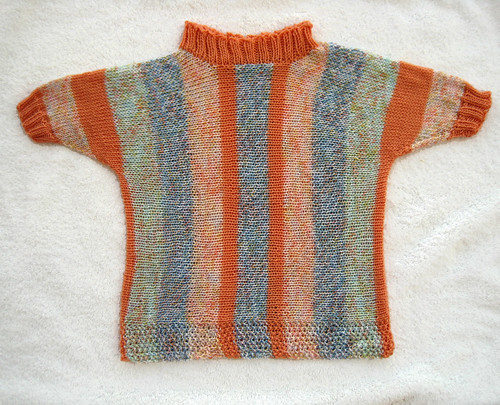
I used four colors of a weird yarn (Stampato Color Baby) that I found in a teeny yarn store somewhere. It's a nice 100% merino fingering weight and the garment needed about 300 yards with size 3 needles (size 2 for the ribbing). I changed colors every 12 rows, but if I were to knit a second sweater, I would use self-striping sock yarn, because weaving in all those ends were way too much trouble for a lazy knitter like me.
Pithy Directions
Using smaller needles, cast on 36 stitches and join in a circle.
Rib for 9 rounds (K2P2).
Knit 1 row.
Increase 4 stitches evenly across the next row. (40 stitches)
Change to larger needles and knit 1 row.
Increase 1 stitch at the beginning and end of every other round 9x. That is, increase 18 stitches. (58 stitches).
Cast on 39 stitches by wrapping the yarn around the needles 39 times. The 9 stitches at the bottom edges in the sample are worked in moss stitch. Alternatively, cast on 30 stitches and when you are finished with the rest of the sweater, pick up 96 stitches across the bottom and knit 9 rows of K2P2 ribbing.
Work 36 rows for the shoulder area.
Split for neck (front and back are worked identically):
Decrease 1 stitch at the neck edge 6x.
Knit 24 rows.
Increase 1 stitch at the neck edge 6x.
Join front and back by knitting without turning at the neck.
Knit 36 rows for the other shoulder.
Place markers for the sleeve--the easiest way is to count 39 stitches from the bottom edges of the front and back.
Turn the garment inside out and do a 3-needle bindoff of the body stitches. Or graft the 39 stitches together, if you like.
Place the 58 sleeve stitches on 2 circulars and decrease 1 stitch each side every other row 9x. (40 stitches)
Knit 1 row.
Decrease 4 stitches evenly across the next row. (36 stitches)
Change to smaller needles and knit 1 row.
Rib for 9 rounds (K2P2).
Pick up 96 stitches around the neck area with the smaller needles and rib for 9 rows.
Bind off really loosely--babys' heads are larger than you think they are.
Wednesday, May 20, 2009
Knitting Rules of Thumb
Every so often, I come across an approximation that makes sense, is easy to remember, and I actually write down in my knitting notebook under the heading Cool Things That Are Easy to Remember but I Forget Anyway. I was flicking through said notebook the other day looking for something I have already forgotten about, and stumbled across the list. Because I am feeling way too lazy to photograph the center of the King Bat (aka Queen Ring) shawl that I finished a few days ago, I figured the list entries might come in handy for some of you. And make me feel less guilty about not stretching, pinning, photographing, cropping, uploading, and so on and so on.
Please remember that these are Rules of Thumb, not Inviolate Laws of Physics. If one or the other doesn't work every time, perhaps you could arrange for a different thumb or something.
- If you don't know what needle size might work best with a mystery yarn, thread the yarn through your needle gauge. The best fit is a good size to start with for regular knitting. For lace, try doubling the needle size.
- Don't want to (or can't) measure someone's foot? The length from the tip of the index finger to the base of the thumb is about equal to the length from the toe to where the foot connects to the leg (measured at the top of the foot). I discovered this one day when I put my sock over my hand. Why did I do that? I don't know.
- The measurement from the base of your thumb to the inside of your elbow is the same as the total length of your foot. Seems incredible, but it's true.
- If you stretch out your arms and measure from fingertip to fingertip, the length is the same as your height. You might find this useful when knitting shawls (Thanks, Carla!).
- The circumference of your wrist is about equal to the circumference of your foot at the arch. I have never needed to know what my arch circumference is, but I am sure there's someone out there who has been panting after this fact.
- The sleeves of an average sweater uses 1/3 of the total amount of yarn; the back takes 1/3, and the front 1/3. If you are not sure that you have enough yarn, knit the sleeves. Then you can adjust the body by, say, making it shorter, using a different yarn for the yoke, or blending in another dye lot.
- A cable takes about 10% more yarn than knitting the same stitches flat. This is an important rule of thumb if you decide to add some cables to a plain sweater--you'll need to cast on extra stitches or the fit of the sweater might be a big surprise. Actually, it would be a small surprise, but you know what I mean.
- Changing the size of your needle will change the gauge by about 1/2 stitch per inch for each needle size increment or decrement.
- One row of knitting uses about 3 times its length in yarn. This is a nice factoid for long-tail cast-on that eludes me every time I do a long-tail cast-on.
- According to the folks at Elann, if the gauge of a single strand of yarn is X stitches-per-inch, the gauge when used doubled will be X*.7.
- Also via Elann--if the project requires X ounces of yarn used single-stranded, it will require X*1.4 when used doubled.
- If you want to make a circular shawl, the general rule for increasing, is to increase four stitches every round, eight every other round, 12 every third round, or 16 every fourth round. There's some geometric flim-flam going on here. Please don't try to explain it to me.
- Eight increases/decreases every second round will give you a flat knitted circle. Six increases/decreases every round in single crochet will too.
- If you make six increases every second round, then knit x rows (where x is the number of rows with increases that you just made) then decrease six times every other row, you will get a ball.
- Two increases/decreases in the center of every second row will give you a 90 degree angle. That one’s pretty obvious, but it’s so useful.
- The last row of a project takes as long to knit as the rest of the entire sweater/sock/hat/scarf. This is a prime example of the Time Dilation effect.
