Fleegle's Blog

Saturday, May 4, 2013

Constitutional Confetti (non-knitting)

For the past umpity-ump years, I've started my day by fixing a cup of coffee, then flipping on my computer to peruse Google News. I then zipped over to my iGoogle page, which contained an embedded Google Reader widget. Last year, Google announced that they would be ceasing iGoogle in November of this year. I found this profoundly upsetting--part of my morning routine would need some rearrangement. I finally switched over to Netvibes, a service that is fairly similar to iGoogle. In some ways, it's even better than iGoogle, but lacks the compact Reader widget that I have come to rely on to quickly peruse the news from the 200+ blogs to which I currently subscribe.

Thus, when Google announced a few months ago that they would cease Google Reader...well, I can tell you that those precious early-morning coffee-sipping moments had suddenly become a vacuum begging to be filled by something...anything...that worked as well as Reader. Since those early days of iGoogleness though, I've started flipping open my iPad more often than my laptop. I've found that Flipboard (no pun intended) is a pleasant companion for my coffee, and Newsify is a reasonably good substitute for Reader.

All of this searching for substitutes got me thinking about Google in general. Like many services, it's become more social, proffering sites such as Google+ as a way to force interaction. Not being especially comfortable with this idea, I took a hard look at the Google apps on both my iPad and my laptop, and frankly, didn't like what I saw.

I had installed Chrome, the Google browser last year, but never use it, because the cookie controls are terrible. In Firefox, I can disallow cookies, allow them for a session, temporarily allow them for a site, and easily manage cookies globally or on a site-to-site basis. I am uncomfortable with sites that require cookies to do something as simple as browse their pages, and the inability to control these little bits of tracking crumbs turned me off of Chrome.

I became so uncomfortable with this tracking stuff that I installed a Firefox add-on called DoNotTrackMe. The icon sits quietly in the toolbar, and when you click on it, it tells you how many tracking attempts it has blocked. To my utter horror, after a few months of use, the information popup told me that the add-in had blocked 20,000 trackers. After a year of use, I've earned my second Platinum Medal--each one worth 50,000 trackers. If the idea of 100,000 stalkers doesn't bother you, well, you might as well stop reading this blog post now.

A few months ago Roy was wandering around the Web, looking for something, which he ended up not purchasing. The phone rings. There's a sales lady on the other end who said she saw him browsing their website but didn't buy anything. Can we ask why? Can we make an offer that you might be interested in? Roy replied that they didn't have the cheapest price...and some haggling then ensued. However, Roy was so creeped out that, even though the sales lady said she would price-match, he ended up not buying anything.

That episode was the final straw that led to my subscribing to a VPN--a virtual private network. In the simplest terms, a VPN is a network that tunnels through the Internet by using encryption and other security measures to hide you from peepers and stalkers.

When you hop onto the Internet, either by opening a browser or, these days, by turning on most any computer, your Internet provider assigns you an IP address, for example, 123.45.32.123. As you waltz from site to site, you can be uniquely identified by this address. When you use a VPN, your real IP address is cloaked by the address of the VPN server.

The VPN service I signed up for has servers in many countries, so I can log on to a server in Atlanta, or Chicago, or Tokyo, and to the salesperson watching me, I appear to be located in those places, but the IP address leads nowhere. Which means trackers on me lead nowhere. And good riddance.

After fooling around with the VPN for a while, I did what a lot of people do every day, I went to Google and searched for something. To my surprise, I received an error code: We're sorry, but your computer or network may be sending automated queries. A quick search on a computer not hooked up to the VPN revealed that you can't use Google Search if they can't track you. Needless to say, this little factoid caused me to switch over to the very good Duck Duck Go and Startpage search engines, which do not track you at all.

All this was starting to remind me of Winston Smith, the protagonist in George Orwell's classic 1984. Winston found one corner of his living room where Big Brother couldn't track him via the ubiquitous two-way telescreens that monitored the private and public lives of the populace.

There's nothing inherently wrong with advertising, which is where all this cookie tracking stuff originated. After all, if nobody advertised their stuff, you would not know about the choices available to you. But it's a long, long way from presenting an advertisement to having marketing firms, law enforcement, and government agencies keeping track of the minutiae of your daily life. If you think by eschewing the Internet you're safe from all this, you probably skipped over all the articles on drones that grace the pages of your local newspaper.

The result of all this research has led me to excise all Googleware from the machines that I use daily. In the next few weeks, all the devices in this house will be behind the VPN. Fortunately, Google Blogger doesn't care if they can't track me here, but I am seriously eyeballing WordPress as an alternative. I am looking at a private mail service, as well. Gentlemen don't read other people's mail, and clearly, our government no longer contains anything resembling gentlemen.

While it's impossible to be anonymous on-line these days, it is possible, with a little exertion, to keep a low profile. And if you think that these measures are necessary for safety and security (of our children!), I urge you to read, or reread, 1984. I've been around for almost seven decades, and I will escape what looks like this inevitable future. However, you, or your children, may see a world similar to the one depicted in that book. 

As a final thought, you should think about the fact that I was hesitant to publish this post at all, for fear of being placed on a government list.

fleegle pats her tinfoil hat and signs off.

Sunday, April 21, 2013

The Sharksucker

This is a non-knitting post that will be most likely be totally uninteresting to anyone without an iPad. I felt obliged to blog about this cool little keyboard case because it's entirely obscure and deserves a little press. If you google Sharksucker, you'll be directed to (a) a Wikipedia article about remoras, (b) a bunch of websites that have no actual information about this keyboard case, or (c) a Chinese site written by the Sharksucker creators and translated into foggy English. What you will not find are any genuine reviews, comments, or even press releases about it anywhere else on the Internet besides the developers' own website.

Let me backtrack a bit here and say that when I bought my iPad last fall, I also purchased a Zagg keyboard case to go with it. In general, I like the case. It's solid and the keyboard itself is excellent. However, I was not in love with it for several reasons. First, once the iPad is inserted into the case, you can't get it out without a real struggle. That means that if you want to use portrait mode, charge the keyboard, or just grab the iPad to do a little bedtime reading, you're out of luck.

Second, the Zagg is limited to a single angle, and it's not a good angle for me--it's tilted too far back. This was a real problem for reading in bed, because I had to hold the iPad forward in an upright position with one hand. Third (and fourth), there's no wrist rest and the indicators are between the rear of the iPad and the case itself, so I had to poke my nose into the little space to see what the lights were showing. Finally, the Zagg case is heavy. I don't have the specs on me, but I would guess that it adds a half a pound of weight to an already zaftig device.

So I went on a hunt for another keyboard case that would address all these complaints. I watched more than a dozen videos and perused an equal number of "Best Keyboard Cases" reviews. Every case had a drawback, and I wasn't going to plop down another wad of cash for something that solved some, but not all, of my quibbles.

Thus, when I ran across the YouTube video for the Sharksucker, I was entranced. The video itself is, um, well, you just have to watch it yourself. It somehow amalgamates a commercial for feminine hygiene products with a cheap cruise advertisement. That is to say, there's a flower-filled field, drinks with paper umbrellas, beautiful ladies, and a great deal of hyperbolic voice-over.


However, they keyboard case itself seemed to be exactly what I was looking for. Considering that the price started at $169, was marked down to $99, and then when I actually placed the order, the cost appeared as $69...how could I resist?


It took about a week to arrive, and I have to say that I am impressed with it after using it for two days. I first had to extricate my iPad from the Zagg, which took about five minutes of prying, tugging, and cursing, and I broke a fingernail, too. I then plugged the Sharksucker into my laptop to charge it, which took about an hour. As you can see from the photo, the Sharksucker (where the heck did that name come from anyway?) can prop the iPad in either the landscape and portrait position by just picking up the tablet and plopping it into the brackets in either orientation.


It has a wrist rest. Because the iPad snaps into the brackets magnetically, the entire unit is solidly mated, but it's somehow still easy to pluck the tablet out in the evenings for bedtime reading. The angle is much better for me, and it's somewhat adjustable, although it doesn't tilt back very far.

The case is handsome, lightweight milled aluminum and feels sturdy and well-made. The keyboard is easy to type on, the keys themselves feel crisp and not mushy, and there are Page Up/Down/Home/End keys, which are missing from the Zagg. I do a lot of word processing with my iPad, and I really missed those keys. The Zagg does have Cut/Copy/Paste keys, but I use keyboard shortcuts instead, so those were a waste of key functions for me.

The only complaint with the Sharksucker keyboard is that the right shift key is too small and too far to the right, but I will adjust to it. My pinkie needs the exercise, anyway. Here are the two keyboards, so you can see the differences. The Sharksucker is above, the Zagg below.


Finally, according to the documentation, one charge of the keyboard battery will last for six months at a rate of two hours of use a day. The battery itself can be used to charge either the iPad itself or another device by plugging them into one of the two USB ports on the side of the keyboard. And there are little rubber bumpers to prevent the iPad from resting on the keyboard keys when the assembly is closed. True, this case, unlike the Zagg, doesn't protect the back of the iPad, which means that the unit has to be inserted into a sleeve to protect it from scratches when transporting it. A bubble-wrap baggie works fine.

I have to say that the JSXL Tech website makes for plenty of giggle-reading. For example, here are a few highlights of the Sharksucker:
  • The unique magnetic suction technical design can firmly suck Apple iPad.
  • Sharksucker adopts flip design,and then enables folding-closing.
  • Adopts high quality chocolate keyboard makes itself tidy and clean on vision.
The formatting on the website is pretty lame and the English is even lamer, but it contains a wealth of inexpensive Android tablets that actually are a good buy if you need a cheapo unit for the kids. There are also unlocked global smart phones and tons of keyboards, with or without a case, at very reasonable prices. And they actually respond to emails!

Monday, April 8, 2013

Flat Rat Pack

I know, the posts are few and far between. But, as I stated a long time ago, I only post when I have something to say that I think my readers would want to hear. Listens to the annoyed mumbles. Well it's true. You don't want me to start posting recipes for beets, do you? I could do that, you know. And add some pictures of the grandkids at Disney World. Looks offstage. Well, they don't have to know we don't have grandkids. I won't tell them if you don't.

 ==> Beet lovers, please, no emails, phone calls, or howlers.

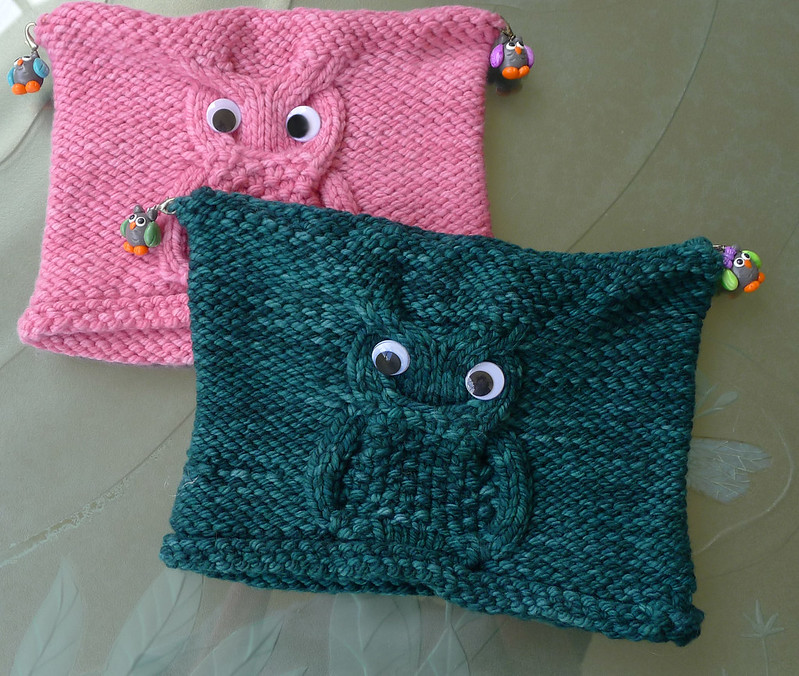
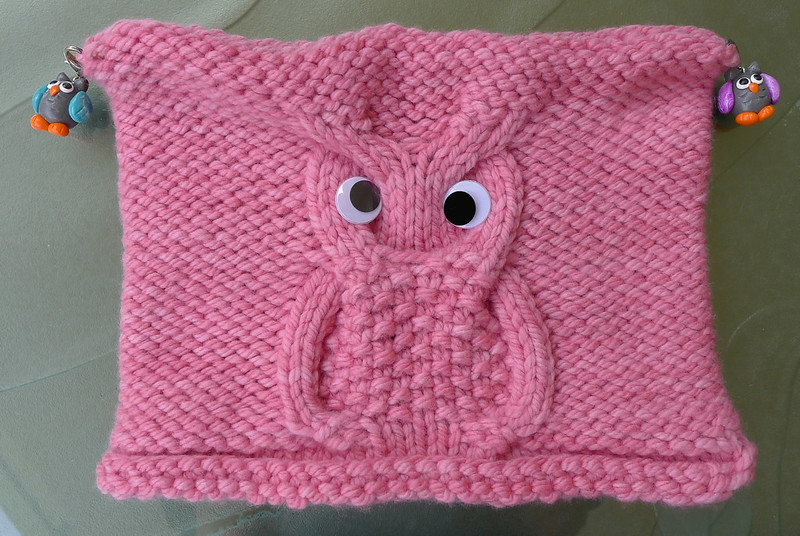
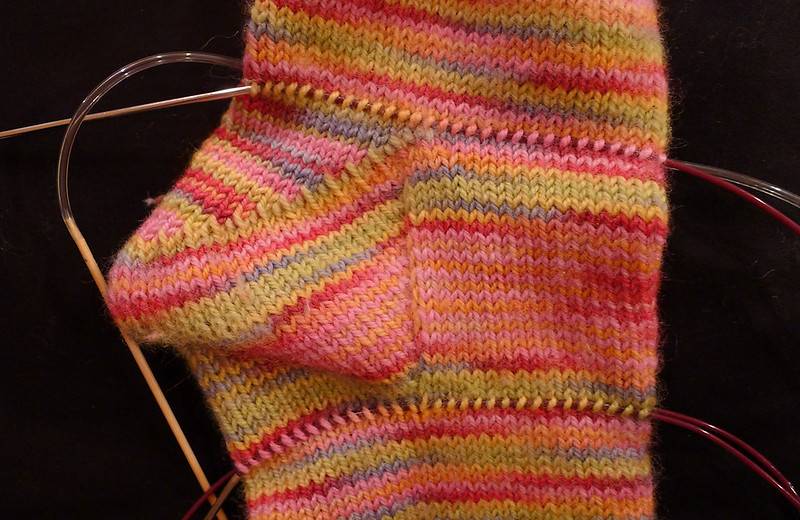
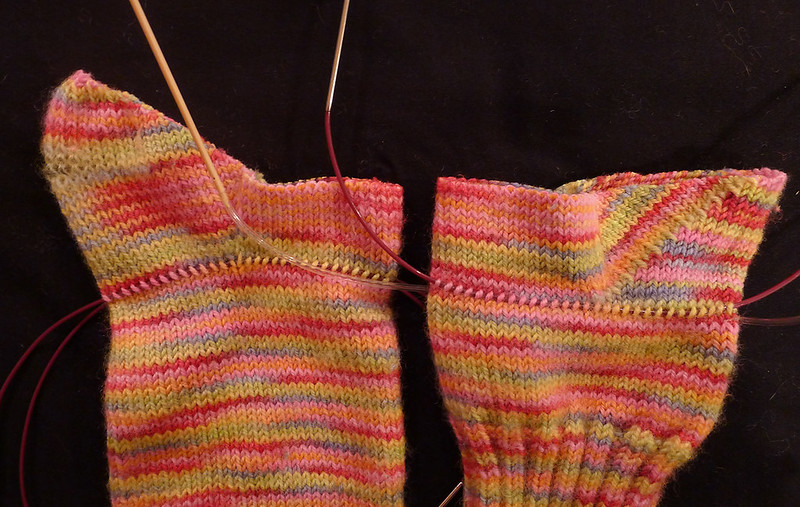
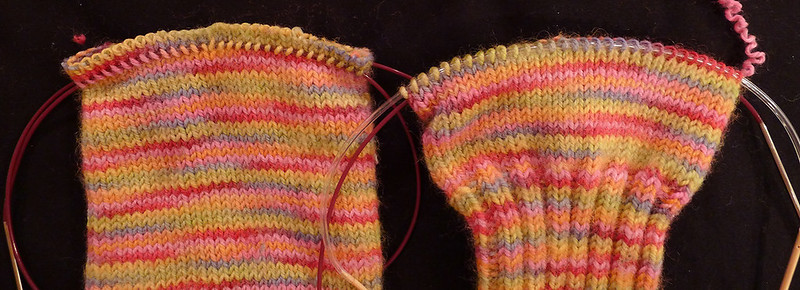
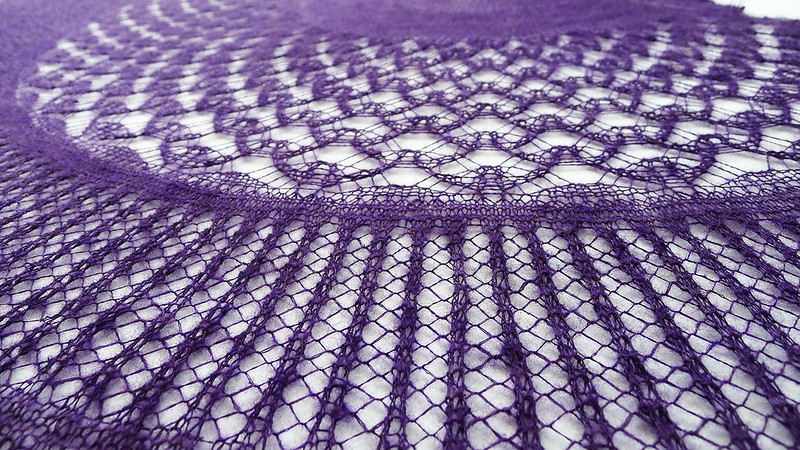
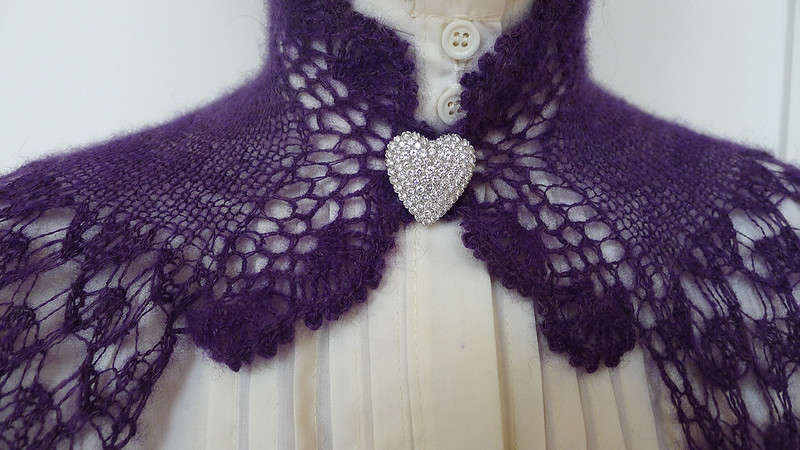
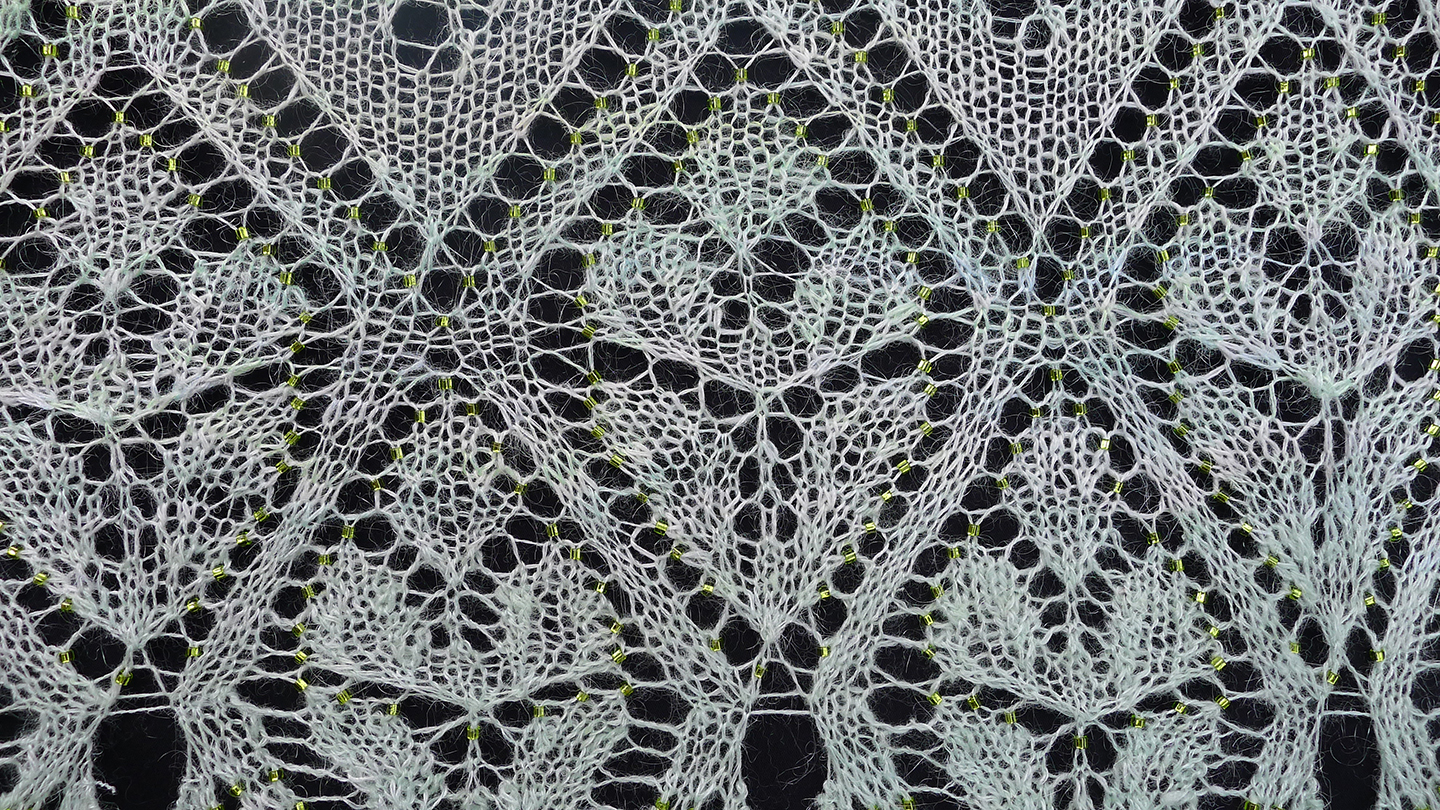
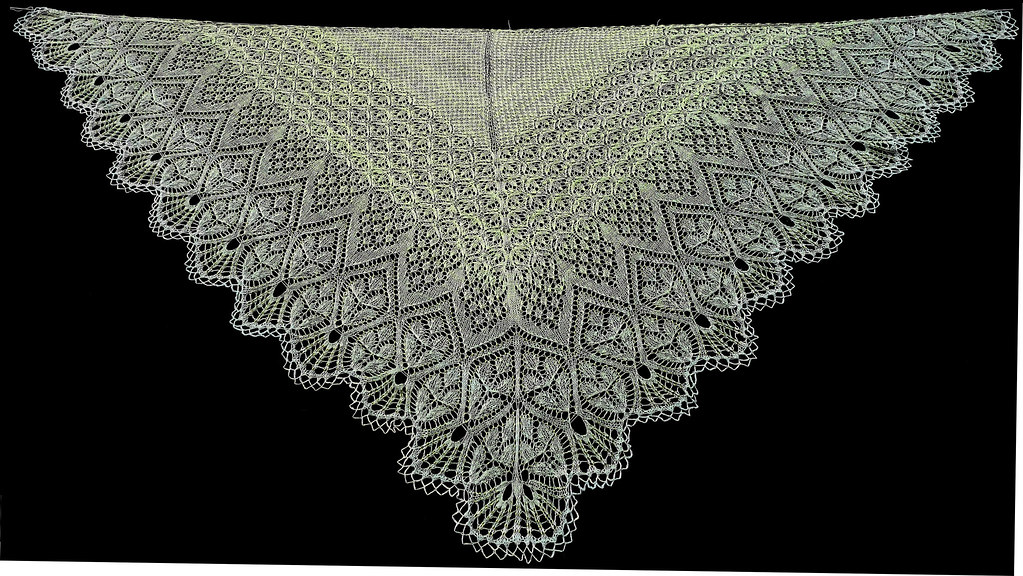
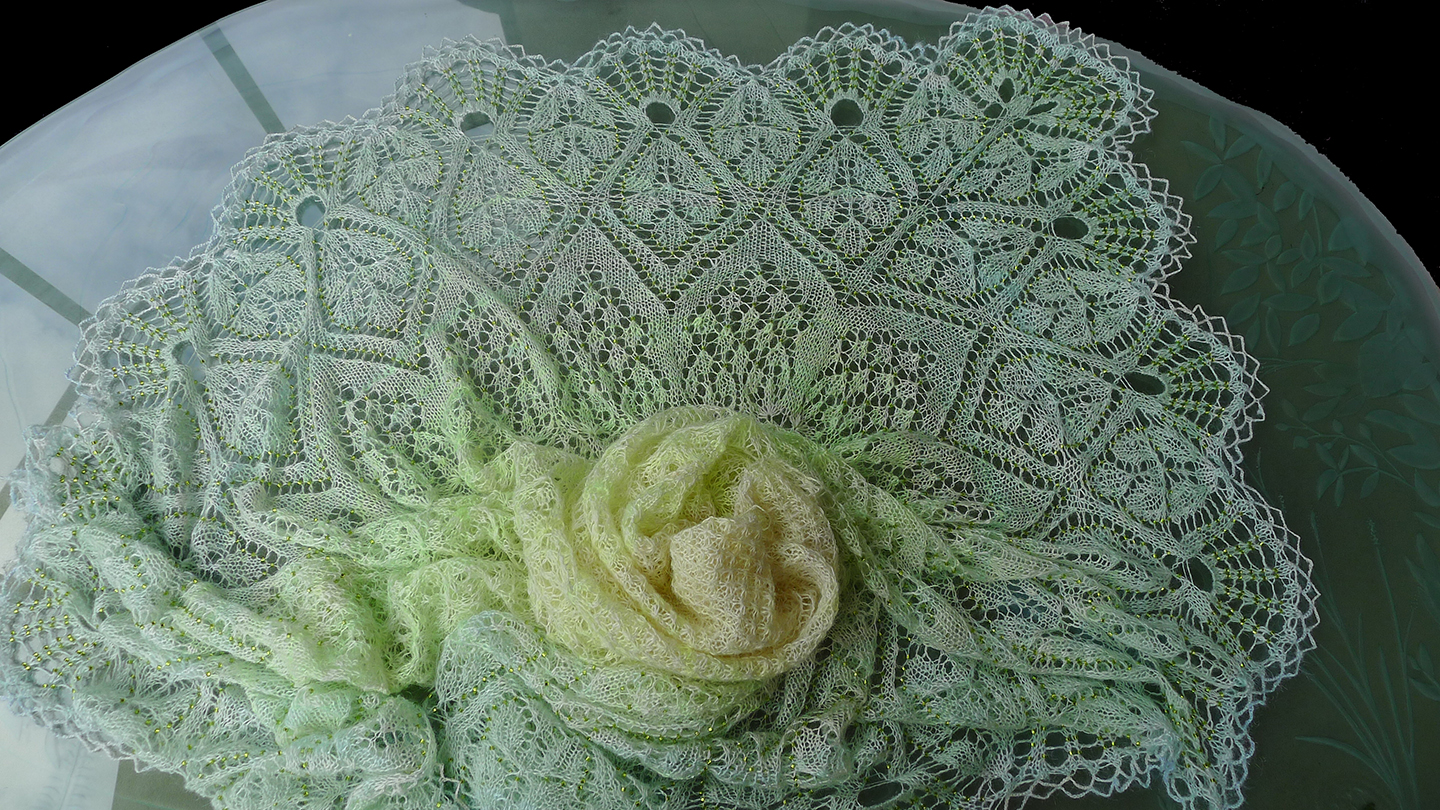
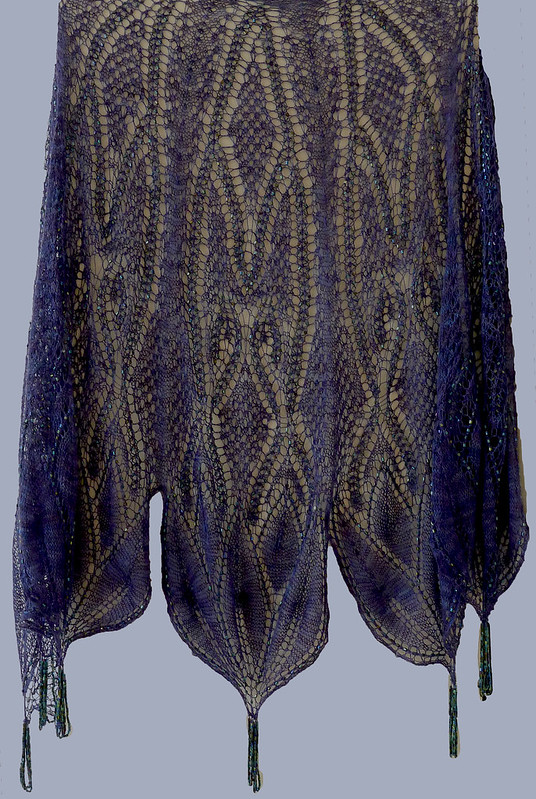
I haven't been blogging lately mostly because I haven't been knitting very much. I did finish a Bohus sweater, though. Considering it was knit with a heavy laceweight yarn, it took me a couple of months to finish. That's my excuse, and I'm standing by it.


Well, back to the rats. Those of you who spin know Neal Brand, a maker of exquisite supported spindles and, incidentally, a math professor. For this past term's project, Neal had his calculus students design the perfect supported spindle. He then turned a sample of each project on a lathe. The results are diverse, imaginative, and of course, incredibly beautiful. They can be viewed by cruising Neal's thread in Spindle Candy, starting around here. Neal kindly allowed me to choose one of the designs and made me my very own Flying Saucer of Awesomeness.

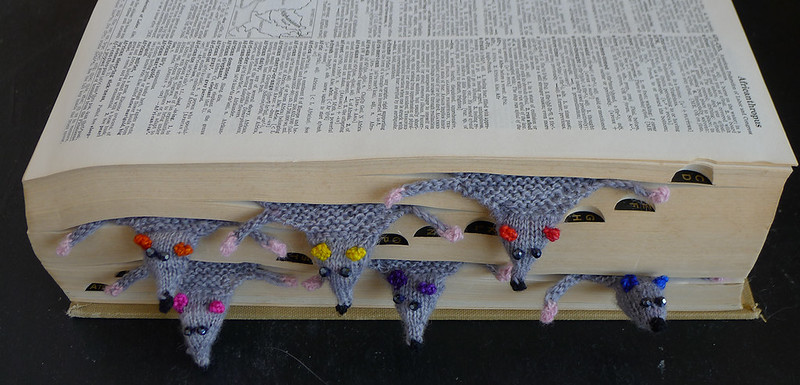
In return, I offered to spin some yarn with the FSoA spindle and make each of the students involved in the design process their very own Flat Rat Bookmark, an item which no one, especially calculus students, should be without.

Note that if you have converted your entire library to eBooks, you can just drape your Rat over the top of your reader to keep it warm. (I notice that the pronoun "it" in the last sentence is ambiguous. The answer is yes, you can keep either the rat or the reader warm.)

The original design, The Squashed Rat Bookmark, is cute, but I wanted something, um, rattier. You know, with a pointier nose, fatter body, and beadier eyeballs. And thus, I spent some time with needles and crochet hook developing a pattern so all of you can make your very own Flat Rat. Mine were made with fingering-weight handspun Tasmanian Corriedale, which, oddly enough, is the stuff Malcolm Fielding's spindles come wrapped in. I dyed the finished yarn Rat Gray, of course.

Here's a close-up of the completed Flat Rat. 


 And here's photo of the Flat Rats in action:


When not in use, these rats stack well.


Head

Make a provisional crochet chain and pick up 18 stitches. Circularize on two or more needles. I found the crochet provisional method the easiest way to make the head. I made decreases on both sides of the head, which produced a pointier nose than decreasing around a single stitch, like you do for a sleeve.

knit 4 rows
knit 3, ssk, k8, k2tog, k3
k1 row
k3, ssk, k6, k2tog, k3
k1 row
k3 ssk k4, k2tog, k3
k1 row
k2 ssk, k4, k2tog, k2
k1 row
k2, ssk, k2, k2tog, k2
k1 row
k1, ssk, k2, k2tog, k1
k1 row
3 st left on each needle.

Join black yarn for the nose.
k1, ssk, k2tog, k1
knit 1 row

Run black tail through stitches, run black through stitches again until nose is roundish--about three times. Pull all ends inside of the head.

Stuff head.

Turn the head around and pick up 18 stitches in such a way that the decreases fall on the sides of the head and aren't obtrusive. Put nine stitches on each of two needles.

Do a 3-needle bind-off by knitting together one stitch from each of the two needles. That is, insert the third needle through a stitch on the front needle and a stitch on the back needle and knit both of them off. You now have 9 stitches. Or you should. If you have ten, well, just go with the flow.

Body

knit 2 rows
k1 kfb (knit in the front and back of the stitch to increase), knit to the last two stitches, kfb, k1.
k1 row
Repeat increases 2 more times, to 15 st.

For the first leg, cast on 6 gray and 2 pink stitches by knitting on. Turn and bind off two stitches in pink and the rest in gray.

Knit to end of row, repeat leg on other side.

Resume increases 4 times until you have 23 st.
Knit 10 rows

Decrease back to 11 stitches via these two rows:
k1, ssk...k2tog, k1.
k1 row

Do another set of legs.

Repeat the two decrease rows three more times--you will have 5 stitches on the needle.
Bind off.

Bits

Crochet a chain for the tail. Double yarn between bound-off stitches, chain 17. Knot the ends and trim. Or knit an I-cord. The chain is flatter, but you will probably have to wet and pin it to make it lie flat. Mine curled up into pigtails, which would have been terrific if I were making flat piglets.

Knot pink paw ends together and weave in ends.

Ears are crocheted directly to the head.
SC in two stitches, ch1, turn, single SC, bind off, run ends through head. Or make any other teeny blob-shape using a needle, hook, loom, or potato peeler.

I dampened my rats and pinned them out to make them flatter...I hope PETA doesn't see this picture....


You could just squish the rat in an unabridged dictionary or a Uline catalog for a while if this concept makes you squeamish.

And finally, if you have no inclination to knit a flat rat, you could make one using this handy method:


BIG NOTE

I want to remind everyone that I can't respond to comments without an email address, Ravelry name, or other means of contact. Too often these days there's just no way for me to thank you for your comment or answer your question. Along these lines, I notice fewer and fewer active Blogger profiles. That makes me sad, but as technology and social networking advance, sites such as Facebook and Ravelry have replaced blogging as a primary means of communication. And no, I don't have a Facebook or Twitter ID. I think Facebook and Twitter are creepy. However, you can always ping me on Ravelry if you don't want to leave a public comment.

Monday, January 28, 2013

Customer Disservice

One of the drawbacks of having a retail store is complaints. Our little shop gets about five a year. Some of them have been vituperative, complete with four-letter words and personal threats. Others have been just plain silly--a person who, after eight months, decided the ebook was defective and wanted to return it. Regardless of the mental state of the customer, in all cases, we replace the item or issue a refund. We want everyone to be satisfied, and if for some reason, it's not within our ability to please, we refund the money and thank the customer for patronizing our store.

A few months ago, I bought a $42 circular knitting needle...smiles at the group gasp. The day of the purchase, I had the unpleasant experience of having three sets of circulars needle tips separate from their respective cables as I was working on a top-down sweater. And I was sick and tired of picking up stitches. Thus, I decided to go for the Lamborghini, the Bentley, the ne plus ultra of knitting needles--a Signature.

When it arrived, I reverently unwrapped it...to discover a slight burr on the tip. Oh well. It took five gentle swipes with 800-grit sandpaper to smooth the burr. I was in the middle of the sleeves at that point, so I put the needle aside until I was back at the underarms.

I knit four inches of sweater...and then...one of the needle tips disengaged from the cable. I was flabbergasted.


Here's the letter I wrote to customer service:
____________________________________________________________

Dear Signature-

I purchased this needle on November 29, 2012, invoice #xxxx, Paypal Unique Transaction ID #xxxx.

It arrived with a burr on the tip. You can see where I sanded it off. I knit four inches of a sweater with this needle. This morning, one of the tips separated from the cable and rolled underneath the refrigerator. I am not moving the refrigerator to find it. I am an old woman with a bad back.
Notice that if you run your finger up the remaining join from the cable to the needle, there is a sharp edge on the metal. I was wondering why I was seeing frayed yarn bits as I was knitting. As I paid $42 for this needle, it never occurred to me that the join was responsible. Instead, I was blaming the yarn vendor for the fact that I kept having to unknit areas and join in new yarn. Silly me.

I expect you to replace this needle with one that actually works as advertised. That is, the joins remained joined and doesn't shred the yarn.


And here's their reply:


Dear Susan,


Thank you for your note. You stated you received your order in  November 2012 and at that time you noticed a burr on the needle however you did not contact us regarding the burr. Our warranty/guarantee policy states you have 21-days from the day you receive your order to contact us regarding any manufacturing flaw or defect.  You also stated that you sanded the tip of your needle. As stated in our warranty/guarantee policy: "The warranty is void if any changes, modifications, or additions are made to the needles after purchase." I have included a link from our website detailing our warranty/guarantee policy. Unfortunately by sanding the tip of your needle you voided that warranty/guarantee. 


I am sorry but at this time we cannot replace your needle.  


____________________________________________________________


 Now, I don't know about you, but I infinitely prefer the treatment I've received from KnitPicks when their needle tips go walkabout. They replace them. No fuss, no muss, at least for the four that I have called them about. And I give you three guesses as to which needles I will be purchasing in the future. And which company I will never again patronize nor recommend.

ETA: Less than an hour after this blog post appeared, this email dropped into my mailbox. Yay Internet!

Dear Susan,
I have consulted with our quality control department. They would like to inspect your needle for any manufacturing flaws or defects regarding the rough join/separation issue you encountered with your needle. I have attached a return merchandise authorization form for you to complete and include with your needle. Please use RMA#  XXXXXXXXX.  Which needle from your Nov. 2012 order did the cable separate from; the size 01-5"-32" or size 03-4"-20"?  Please tell me which size needle separated and I will send you a replacement needle.  
Please let me know if you have any other questions.

Thank you,


And finally... 


Good Afternoon Susan,

I wanted to thank you for contacting us this weekend and let you know I have come across your blog post this afternoon and reviewed the customer service practices on how your email was handled.  We strive for 100% customer satisfaction and I am never happy to see that a customer does not receive the highest quality attention to their concerns. 

I see that the information and policy was sent based on the burr being sanded, but as you have addressed in your blog this should not have mattered.  The breaking of the cable from the needle is 100% a manufacturing defect and per our normal policy, you should have been asked for a photo of the needle and a replacement should have been sent out immediately this afternoon no questions asked.    Again I do apologize that your inquiry was handled in this manner and that you did not receive the level of customer service that we strive for.  We aim to produce the highest quality products as well as always provide our customers with service to match.

Please let me know if you have additional questions or concerns and again I apologize for the reply you received.

Thank you,

Daniella Rosenthal
Vice President


Sunday, November 4, 2012

An Odd Useful Invention: The Fleegle Join

Warning: This is a long, rambling post!

I enjoy knitting socks, but even the sturdiest socks eventually wear out. Roy's socks always wear through in the same spot--underneath the heel. I've tried reinforcement, but that just delays the inevitable. The sock yarn disappears, leaving a little network of reinforcement yarn. I do own a sock darner, but the results are always a little lumpy. And ugly. And I hate darning socks.

So, when Roy hands me a sad pair of holey handmades, my process goes something like this. I pick up the stitches on the top end and the foot end:


I cut between the needle sets to produce two halves...


...and then ravel the yarn back to the needles:


Snarky Aside: Notice the fresh and brilliant colors on these socks. That's because the Socks That Rock yarn gave out after about twenty wearings and washings. The faded sock you'll see later in this post was worn and washed for seven years before the lovely Fleece Artist yarn needed repair.

After knitting a new gusset and heel, I used Kitchener Stitch (KS) to connect the two halves together. It takes more time to KS than to re-knit the entire midsection, and frankly, Kitchener Stitch is not my favorite thing to do. No matter how careful I am, one or two of 60-odd stitches is always wrong. No, I am not showing you any pictures of that.

So today I started fiddling around with an odd idea. For some time, I have been longing to make the Paton's Cable Yoke sweater. The lovely example shown below was knitted by Tanis of Tanis Fiber Arts (photo used with permission).


The sweater is constructed by first knitting the strip of cable for the yoke, which is then grafted together to form a circle. The upper and lower parts of the sweater are picked up from the edges of the cable strip.

My thought process then drifted over to the idea of knitted-on lace edgings. For those of you who have never done this, you basically turn your work 90 degrees and cast on for the edging. You knit to the end of the edging, turn, and knit back towards the shawl body. Then you knit the last stitch of the edging together with a stitch on the shawl. Repeat a million times until all the stitches are gone or you have stuffed the thing into the deepest, darkest closet you own, hoping the shawl will dissolve so you don't have to knit any more edging.

So, I thought to myself...what if I started knitting the Paton's sweater from the neck and knit down to the yoke, leaving the live stitches on the needle? Then do a provisional cast-on for the lower body and finish that section. I will have two sets of live stitches that I can join at each edge of the cable strip, which is knitted sideways.

This process would be essentially the same as joining two sock halves with a knitted band instead of Kitchener Stitch.

I found an old sock that needed repair to experiment. After I finished the gusset and heel section, I turned it 90 degrees and cast on four stitches using the Knitted Cast On. Because I had to turn the work to the wrong side to cast on, I actually used the Purled Cast On, which consisted of making a purl stitch in the last stitch on the needle, putting the stitch on the needle, then purling in that stitch, and so on. I purled (through the back loops) the final cast-on stitch with one stitch from the upper sock half, which made a tight join.

I turned the work and slipped the first stitch, knit the two stitches in the center of the strip, then knit one stitch of the strip with one stitch of the heel half through the back loops. Continue turning and working, or do as I do and knit backwards to save time and trouble. Always slip the first stitch, which is the decrease from the previous row. And pull that slipped stitch tight to prevent a hole.


When I got to the end, I picked up four stitches from the beginning and Kitchenered them together with the four left on the needle. If I had been picky, I could have done a provisional cast on at the start, but for such a small number of stitches, it wasn't worth the trouble. Fours stitches of KS is a lot better than 60. 


I used four stitches so I could observe the process better, but it seemed to me that the extra two stitches in the center weren't necessary for the sock join.*

In the next example, I cast two stitches onto the right needle by knitting on backwards, slipped the final stitch to the left needle and knit it together with one stitch from the ribbing half of the sock. Then I slipped that stitch, and knit the next stitch together with one stitch from the heel half. I continued in this way, slipping the first stitch and knitting (or purling) the last stitch of the heel half together with one stitch on the top half. The result is a pretty little braided effect that's smooth on the inside:


I only had to KS two stitches at the end--even better!


This technique can be used to join any set of live stitches, for example, afghan squares, and will hopefully inspire some interesting designs using pretty insertions. The join can be used to replace the bulky and inflexible three-needle bind-off too. The result is very stretchy, but because it stretches perpendicularly to the joined pieces, you don't have to worry about sagging if you are using a heavy yarn. Finally, the join can be as wide as you like and pretty much any stitch can be used for the join, for example, purls, garter stitch, lace, or fancy braided cables.

* I know. Some of you are wondering why I bothered to reknit the gusset and heel on that sad, washed-out sock. It's because the sock yarn has cashmere in it and these little treasures are indefinably soft and sqooshy. You can see how the color has faded over the last seven years, but now they are ready to go for another seven, just like me! Too bad I can't just unravel my failing bits and re-knit them, sigh.

Friday, October 12, 2012

Vostok

About five years ago, I bought some qiviut yarn from a now-forgotten vendor. I hated it. It wasn't anywhere near as soft as advertised, had as much stretch as garden twine, and somehow still warped out of shape after knitting. For the price, I could have bought some cheap acrylic and gotten the same amount of satisfaction.

While I was writing Fleegle Spins Supported, I purchased some unspun qiviut roving from Cottage Craft Angora...and boy, did my opinion of this stuff skid into a complete, 180-degree turnaround. The roving is a dream to spin, dyes beautifully, and knits up into a delicate, luxurious fabric that is difficult to stop touching.

Here's the roving, the spun yarn on a supported Trindle, and the final yarn, dyed a rich, dark purple.


From the admittedly costly and indulgent two ounces I purchased, I ended up with 900 yards of laceweight two-ply, and decided to knit Vostok, an exquisite design by Beth Kling. I used a size 3 needle, and had about 150 yards left over.


As you can see, the shawl consists of bands of ethereal lace, all of which are patterned on both sides.


I like semi-circular shawls, because they don't slide off your shoulders like triangular ones do. I was, however, bothered by the neck area, which seemed insubstantial. The shawl hangs from the cast-on edge, and that made me uneasy. And when I tried on the shawl, the neck just looked unfinished.

After consulting my library of crochet patterns, I decided to add a small collar. You can see it in the first photo--it's the odd thingie sticking up at the top of the shawl.

And here's what it looks like when worn:


And from the back:


I hadn't crocheted lace in a long time, but it didn't take long and I think the result is visually pleasing. I will be adding a similar collar to my Nouveau Beaded Capelet to give the neck a bit of body. That's a heavy shawl and a little collar will add strength, as well as a bit of interest to the neck area.

Monday, September 3, 2012

Echobellinaria


My Echobellinaria shawl started out innocently enough as Melissa Lemmon's lovely Silver Bells and Cockleshells. I had a ball of handspun laceweight--1400 yards--and the requisite 1000 beads for the border and figured I would just mindlessly zone out through the tedious number of small motifs in the top section. It would, I told myself, be worth it to endure a bit of boredom because of that truly stunning border.

I cast on on with size 4 needles and knit the setup…realized that was too big a needle, switched to size 3, knit the setup…too big, cast on a with size 2. That looked nice, but after two repeats of the pattern, I tossed down the needles with a huge sigh. There was no way I was going to knit miles of those little diamond thingies and Harry had scuttled away after watching me play musical needles for an hour.

I perused my Ravelry Favorites, and decided to work a pretty little mashup composed of several patterns. I would knit some repeats of Laminaria, then some repeats of Echo Flowers, and finish up with the lovely border on Silver Bells. For the most part, the stitch counts in the three sections were perfectly compatible and required very little fudging to make it work.

My Post-It note, which detailed the concept, read:

Laminaria star chart and transition chart
Echo Flowers chart
Silver Bells and Cockleshells edging

I cast on with a size 2 and knit the Laminaria setup…hmm, too small a needle. Tried again on a size 3, and again on a size 4, and yet again on a size 5. That looks nice. By this time, my herd of knitting needles was cautiously edging away from me. You could hear them mumbling about people who couldn't make up their minds and piled up rejects without regard to order, decorum, or dignity.

Off we go. Knit the first repeat. Holy Merlin! That was the UGLIEST center stitch I have ever seen! Ripped it out and tried a few things for the center stitch…until I realized that a plain knit just continued the pattern and didn’t leave much of a backbone.


I figured five repeats would be enough, but it looked a bit mingy, so I knit two more repeats before proceeded onto the transition chart, and then the Echo Flowers pattern. Plenty of yarn left, so I did seven repeats of this pattern, too.


The Echo Flowers repeat is 12 stitches and the Silver Bells edging repeat is 24 stitches, but I had to flim-flam away 12 extra stitches to make the border pattern work out correctly. On the outer edge, I decreased away 3 stitches on the first row. At the center, I omitted the increases until the stitch count caught up to the pattern.


As I was blithely knitting away, popping on beads with abandon, I turned  to the final pattern page and noticed that there were a slew of 1 to 16 stitches increases on the last part of the border. The double set of crocheted loops was really going eat up the yarn, too. I needed to spin more yarn.  A lot more.

After I found some matching fiber, I eyeballed my diminishing bead supply. As I mentioned in my last blog post, every single tube of beads I own has a stock  number and supplier neatly printed on a small label...except the ones I was using. It took me two weeks to figure out where I had gotten them, then I called the store and had them send me two more tubes.


By the time I arrived at the truly lovely edging, my pretty little shawl had mutated into a blanket/car cover...I mean, I should have had some idea that things were getting out of hand when I used up the 1400 yards in the original ball about a third of the way into the border.


Be that as it may, the final piece measures 96" across the top and 54 inches deep...sufficient to keep any two people or a station wagon warm on a cold day.


The lovely color gradient isn't apparent when the shawl is lying flat, but you can see it in this photo:


 If I were going to knit it again (fat chance), I would go with five repeats each of Laminaria and Echo Flowers. It would still be a large undertaking, but I probably could have completed it with the original yarn and beads.

Saturday, August 25, 2012

Two Tweaks

My latest project, Echobellinaria, is an fascinating mashup of Laminaria, Echo Flowers Shawl, and Silver Bells and Cockleshells, knitted with handspun merino silk. Alas, the ubiquitous, obnoxious Murphy showed up in my kitchen while I was on the home stretch. I ran out of both yarn and beads twenty rows from the end. I spun more yarn, but have had the darnedest time trying to find matching beads. All of my bead tubes sport labels with both the company name and bead number, except, of course, the tubes I decided to use for this shawl.

I finally remembered where I purchased them, and called the store yesterday. I'm hoping against hope that they are a good match, because the other three tubes I ordered from various web stores weren't.

fleegle hands Murphy a cup of coffee laced with the Draught of Living Death and gleefully watches him drink it down....

In the meantime, I thought I would post two quick tweaks for improving efficiency. If you don't spin or bead, well, stay tuned for the next post, which will hopefully be replete with Echobellinaria eye candy.

Spindle Shafts

I have small fingers, and find twirling spindles with thick shafts very difficult and tiring. If you are experiencing the same problem, try sanding down the top of the shaft. For me, reducing the shaft diameter from the one shown on the left to more svelte version on the right makes for a miraculous improvement in spindle efficiency. Give it a whirl, as it were.


 Use a piece of 220 grit sandpaper about 2 inches wide to quickly reduce the diameter of the upper two inches or so. When you get close to the final diameter, go down to 600 grit, using a piece about 1 inch wide.

 Be careful to revolve the spindle as you sand so the shaft remains round and true.

For the final polish, use 800 grit, about 1 inch wide. Some people might want to wax the sanded area or use wood polish, but I haven't found it necessary.
 
Beader Tweak
I was hesitant to post this, but figured someone might be adventurous and try it. The other day I was fitting the caps onto my beaders, and I accidentally bent the tip on one of the 0.8mm beaders about five degrees. I couldn't sell it, so I set it aside for me. I used it this morning, and found it to be a huge improvement. The slight bend forced the yarn to slide right into the slot. Here's a photo:


I grabbed another beader and used the cap to bend it VERY GENTLY...and it worked splendidly.


Wednesday, July 11, 2012

A Billion Beads, Redux

Harry returned home a few weeks ago from his wild and wacky vacation at the Blur Bowling Ally in Tirana, Albania. If you click the link and watch the live webcam, look for his condo--a black box at about 1:00. Note the little stage at the top, where he entertained the bowlers with his newest gig--Gangsta Rap Noh, a tasteful blend of contemporary stylistic repartee and traditional Japanese dance. Frankly, I think a bowling alley is the perfect spot for his performance...the crash of falling pins is a lovely accompaniment to his, um, singing. 

While he was resting, Harry spent his time working for my Etsy shop, The Gossamer Web. From a passing bowler, Harry managed to obtain some spring steel, a couple of files, and enough goat cheese to stock his pantry. The result: The Fleegle Beader, our answer to the crochet hook-floss threader-wire methods of adding beads to your knitting. (Sorry, Harry ate the goat cheese.)


After considerable debate, we decided to name it The Fleegle Beader, because I pointed out that The Harry Beader sounded ridiculous. However, Harry does star, along with other members of his extensive family, in the Ravelry ad. It took most of the day to get everyone lined up on the supersized beader handle, but we thought the ad turned out pretty well.


These beaders are available in two sizes.

The 0.8mm size is for designed #8 and #11 seed beads. It will hold about 60 #8 or 90 #11 beads. The picture below shows a mixture of #8 and 6mm faceted Czech glass beads with teeny, tiny holes. I like to use these beads as nupp replacements.

The 1.0mm size is designed for #6 or #8 beads with large holes, such as Delicas. It will hold about 60 #8 Delicas--my favorite bead for knitting.


The tip has a hook that will work with yarn as thick as heavy fingering weight.


The bottom of the beader is bent so you can use it with a bead spinner. Comes with a tip protector and two stoppers for the bottom, because you might lose one and I don't want you to be unhappy.


Wednesday, June 6, 2012

Bear with Me...

Life Lesson # 4545: Beware of anyone bearing a large, orange Home Depot pail and a really big grin. Although he ostensibly went for a walk in the woods, somehow Roy returned home with about two pounds of, um, grizzly bear fur.

His story (verbatim):

I was walking in the forest, when all of a sudden, a huge, ferocious, mean, nasty, scary grizzly bear leapt out of the trees, intent on stealing my fruit bar. We wrestled for a while, and after a few right hooks and an uppercut to his snout, I forced him onto the ground and held him down in a hammerlock. Knowing how much you love exotic fiber, I whipped out my trusty comb, ran it through his/her pelt, and collected the fur in this handy orange pail that I always take camping, because you never know when you'll need one.

The real story, needless to say, revolved around the nearby bear park, a kind manager, and the same orange pail...

Never having gotten close enough to a bear to run my fingers through its fur, I was prepared for just about anything. My sense, from looking at bears from a respectfully healthy distance, is that the fur would be rather coarse. And I was right.


Not surprisingly, bears shed in the summer months. The fur is a mixture of long hairs and a reasonably soft undercoat. We washed it gently in a bit of detergent, the rinsed it and let it dry in a mesh bag overnight.

 Raw grizzly bear fiber

 I spent an hour with a fine-toothed comb and removed the outer hairs, leaving a handful of springy short fur that felt quite like Shetland wool. And like wool, bear fur is well lubricated, containing a healthy amount of, um, bear oil?

Dehaired grizzly bear fiber


I didn't think that spinning the undiluted fur would be rewarding, so I grabbed a bit of merino/silk, and carded it with the bear fiber. The ratio was about 30% grizzly, 70% merino/silk.

Grizzly bear fiber carded with merino/silk

Grizzly bear fiber and merino/silk rolag

Then I grabbed a Tibetan supported spindle and spun it into a single, two plies of which will make a fingering weight yarn.

   Grizzly bear fiber and merino/silk, spun on a supported spindle


This stuff is surprisingly pleasant to spin--springy and not the least bit slippery, thanks to the natural oils. It was easy to pluck out the remaining coarse hairs, producing a lively yarn which, while not luxuriously soft, would make interesting outerwear. And Roy, after his death-defying escapade, certainly deserves an ear warmer made from handspun merino/silk/grizzly bear.

The fur was donated by Mikie, a Rocky Mountain Grizzy, ten feet tall, weighing in at a svelte 1000 pounds. Mikie's day job is acting; he starred in Budwiser commercials in 1997 and 1998. No, I don't know what he was doing with the beer. Probably eating the cans whole.


Sunday, May 27, 2012

A Billion More Beads...

A while back, I wrote a post about making a more efficient beading crochet hook by gently applying a Dremel to the shaft of a crochet hook:


I was happier with the edited hook...but not ecstatic....6000 divided by 12 beads per load is (scribble scribble) 500 bead loads. The hook is heavy, so it can't be parked on the knitting itself. Worse, the only place to put it while knitting non-beaded stitches is in my mouth (tastes, um, beady?) or on the table (rolls around, beads slide off the hook). It was a better solution than a regular crochet hook, but not the ultimate one.

With my usual impeccable sense of timing, I started thinking seriously about more efficient beading methods after finishing the capelet. I have gathered here all the tools and techniques I could find, and present you with the options, complete with photos and snarky pithy commentary.

Crochet Hook
The tiny crochet hook is probably the most common method of adding beads to your knitting. You put a bead on the hook, snag the stitch, and pop on the bead:


An ordinary crochet hook can hold about four or five beads, which means you have to reload fairly often. Sanding down the shaft can increase your, um, bead magazine to about a dozen or so, but for something like the capelet, the crochet hook is wildly inefficient.

Also, the nature of a hook means that it's a bit bulky, so you have to use a tiny size (US #11-14 or so) to ensure that the hook can fit through the bead hole. A miniscule hook can often present an unhappy experience with heavier laceweight yarn by grabbing part of the yarn, separating plies, and can also inadvertently break fibers.

Crochet hooks are easy to find, though, and you can also use them to crochet and fish tiny objects out of crevices.

Dental Floss Threaders
The concept is excellent. There's a stiff end for threading and a foamy section on which the beads rest comfortably without sliding. You can string a lot of beads onto these and use the extras to floss your teeth or tie up tomato plants. Threaders are cheap and readily available at any store that carries dentalware.


You insert the stiffened tip through the stitch, pinch the threader closed, and slide the bead over the tip and the yarn thusly:


I don't like using floss threaders, because the tip isn't very stiff, so pinching it closed feels awkward for me. Adding beads can be tedious, too, as it can't be used with a bead spinner. The tip is straight, so it can't be easily parked on the knitting.

On the plus side, threaders are lightweight and can be flopped over your arm or around your glasses.Or you can floss and leave it between your teeth until you reach another beading stitch. Your dentist will be so proud of your sparkly clean molars!

Beading Wire
I read about this technique on Melissa Lemon's blog (she's the Nouveau Capelet designer). It's the same concept as the floss threader, but uses nylon-coated, .015″/.38mm Tiger Tail, which is a flexible, braided stainless steel, nylon-coated wire. It's very cheap and available in almost every bead store.


Just cut the wire to the desired length and tie a bead on the non-working end or make a knot to prevent the beads from sliding off. Then make a hook on the working end by folding about a inch of the wire back on itself.


To use the wire, hook the folded section into the stitch, pinch it together with the main section, and slide the bead onto the stitch:


Beading wire is lightweight and has a hook section that can be parked directly on your knitting. You can thread a zillion beads onto the wire, although be warned, cats think a string of beads is a really fun thing to play with. It wiggles and makes a nice clicky sound when whapped with a paw.

On the downside, the wire isn't stiff enough to use with a bead spinner, and its flexibility makes it it difficult to pinch the hook. Any re-bends you make never straighten out, so eventually, you end up with a wiggly hook...


You can cut off the messy ends to make a clean fold, which eventually leads to a short piece of wire capable of holding a single bead...so you have to make another one.

Lacis Verna Beadle Needle

I saw this on Lacis's website and had to have one. The description made it sound like the ultimate, perfect, beaded knitting solution. The Beadle is billed as an eight-inch length of tempered steel with two rubber stoppers, a hook on one end, and a bent section on the other to allow it to be used with a bead spinner. There are several sizes; the one I purchased can hold about 100 beads:


Alas, the description is misleading. There's no hook. Instead, there's kind of a notch:


The notch on the first one I received was so shallow that the yarn just slid right off of it. I used a file to deepen the notch, which made it work well with cobweb weight, but heavier standard laceweight didn't catch in the notch. Jules kindly send me a replacement, which was a little better, but it tends to grab one ply of the yarn and shred it if I forced the issue.


My replacement lacked the bend at the other end for the bead spinner, but it was easy to make a gentle curve with my fingers. However, I found the Beadle too long to be comfortable, and it can only be parked on a table or in your mouth. You have to use the rubber stoppers to prevent the beads from sliding off both ends. No big deal, but the second thing I did after I unpacked the little guy was lose one of the stoppers. They are small, round, and black, so they cheerfully roll under refrigerators and/or hide invisibly in the shadows around your floorspace.

The beadle is also expensive--about $15 without Lacis's, um, handling fee. It's a clever idea and with a little work on the notch/hook, the Beadle could be a pleasantly viable beading solution.

Guitar Wire
I read about using guitar wire instead of a floss threader years ago, but the recommended wire was a size 30, which is actually a wrapped core. I tried using this, but the finer wire wrapping invariably started unwrapping...


And it was too thick and and difficult to bend, at least for my beads and fingers.

Not to be discouraged, I revisited the guitar wire concept, and found that size 14, a thin, springy, wire, works much better for me. It's thin enough to accommodate every bead size, resilient enough to resist bending, pleasantly lightweight, and won't roll away.


 I cut off a comfortable section and used a bead spinner to whirl a bunch of beads onto the non-hook end. No need to make a bend in the wire--it's springy and conforms comfortably to the spinner bowl.


I took a pair of pliers and bent the end into a hook thusly:


Notice that the hook is bent quite far, but from the side, it's open enough to slide in the yarn:


It's quite easy to close the gap by bending the main wire towards the hook--no need to pinch it closed. Furthermore, the guitar wire has several advantages over the other methods. First of all, like the beading wire, the guitar string can be hooked directly onto your knitting:


Because there's a slight bulge at the hook end, beads won't fall off that end:


Making stoppers for the other end is simple. Use a sharp matte knife, cut a few slices from an eraser stick. Then poke a hole through each one with a thickish sewing needle and just slide it onto the wire:


Both the Beadle and this thing (the Fleeger? The Bleeger? The Bleegle? The FleegleBeadle? The Guitar-Wire-with-Hook-and-Stopper? ) store nicely in thick plastic straws.


.