Problem
When knitting a Shetland shawl, the center square is knitted back and forth in garter stitch. Then the border stitches are picked up around two sides of the square, thus producing the first row of a circular border. However, if you want to maintain garter stitch on the border, every other row needs to be purled. There's nothing intrinsically wrong with purling (there are even some knitters who prefer it), but for most people, purling can quickly get tiresome when the border has 1000+ stitches on each round.
Pseudo-Solutions
The alternative to purling every other round is to turn the work somewhere, somehow, and knit back, essentially knitting the border flat and using some hocus-pocus to bind the two border edges together. All of the solutions rely on a fancy wrap-and-turn on one corner...making a loose yarnover and knitting it with the next stitch; picking up the bump on one edge and knitting it with the last stitch of the row; sewing the seam when the border is completed, and so on. None of these solutions pleased me. I could always spot the turn line from a galloping horse. No good.
Fleegle's Solution
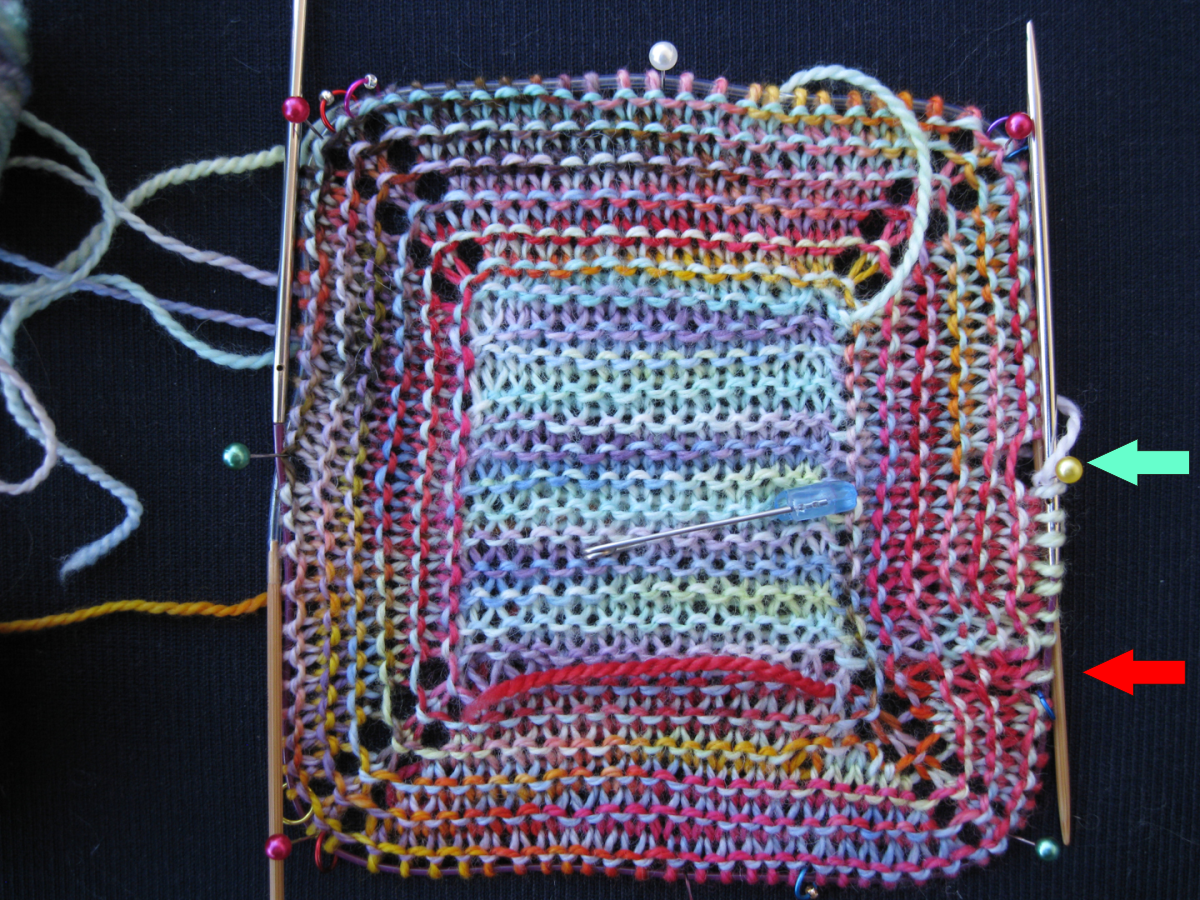
This humble-looking sample represents a solution to a dilemma that has plagued knitters since the first dinosaur broke two limbs off a tree, wound some vines into a ball, and produced the world's first Stegosaurus shawl.
In the sample shown above, the border is knitted flat, not circularly, but there's no discernible seam, is there? The red arrow points to what you might think is the seam, but it's actually the place where the next row begins. Circular knitting, as you recall, isn't really a circle--it's a spiral.
The solution turns (bad pun, sorry) out to be relatively simple: knit the border using two balls of yarn, not one, alternating direction, so that one ball of yarn (A) is knitted in one direction, the other ball (B) in the other direction. The aqua arrow above shows the position of the yarns in the current row and the place where the switch will happen. The trick that makes this solution work is that A and B are going in different directions, there’s no turn at all, and thus no wonky seam line.
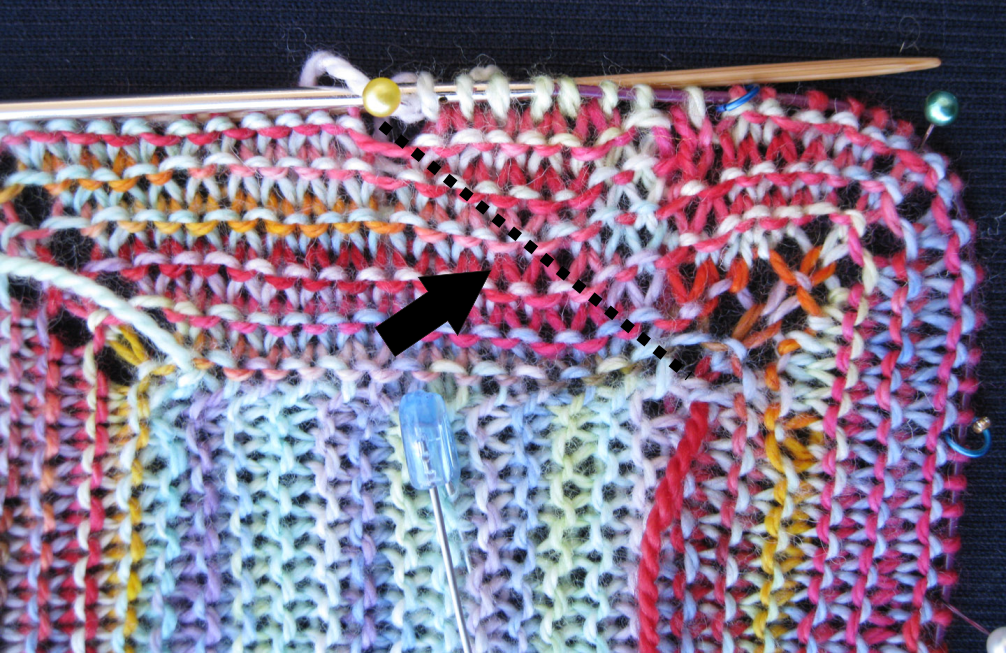
In the image below, the actual color/yarn change for the rows is shown along the dotted black line. Note that the yarn travels one stitch outwards with every other row because of the yarnover increases at the corners. I did a sample where I cheated one stitch and kept the change point in the same place with each row. It didn't make any difference--there still was no seam line.
Here are the directions for a little sample, so you can try this yourself. I used sock yarn scraps in two colors and cast on 13 provisional stitches because I am incredibly lazy and 14 stitches was just too much work. It's a small sample, so when you do the border, you'll need one additional circ or a set of DPNs to go round and round.
Knit a center square with Color A.
Pick (do not pick up and knit) up the stitches along the first side, slip the stitches from the provisional cast-on, then pick up the stitches from the third side, slip the last group of stitches. Don't forget to pick up a stitch at each corner.
Note: At this point, I strongly suggest you rearrange your stitches so that the corners fall towards the centers of your needles, not at the ends. Otherwise, you will be working yarnovers at the ends of your needles, and that's always messy.
You are now at the beginning corner.
Attach color B, turn your work, and knit all the way around to the beginning corner.
Drop B, turn, pick up A, and knit around, working an OKO at each corner.
Drop A, turn, pick up B and knit plain around.
And so on.
In this sample, you will always be doing OKO at the corners with color A and a plain knit row with color B.
I put a safety pin on the side where I should be knitting color A, so I didn’t get confused. Obviously, when you are knitting a real shawl, both balls will probably be the same color. I will therefore put a safety pin on one side of the shawl and a some indicator on the corresponding yarn ball when I use this technique on my Queen Susan shawl.
And, of course, this trick is not limited to shawls--it can be used any time you want to knit garter stitch in the round without purling.


could this method be used on anything knit circularly, say a pullover knit in garter stitch?
ReplyDeleteHoly crap! That is genius, yet so simple. I wouldn't have thought of it.
ReplyDeletePat, I think so, it doesn't depend on the picking up stitches or anything else!
ReplyDeleteDear Pat--
ReplyDeleteOf course this trick can be used any time you need to knit garter stitch in the round.
What ingenious method! Kudos!
ReplyDeleteso simple. an sooo clever! Thank you! Gila
ReplyDeleteyet another trick to try in m y copious spare time. How do you find the time for this sort of finagling?
ReplyDeleteWonderful! Thank you, once again.
ReplyDeleteThis is SO clever. Wow.
ReplyDeleteYou are a genius!
ReplyDeleteI actually like purling, but this is great to know.
Of course this comes the week after I garter-stitched the top of my hat. Looking forward to trying it on the next suitable project.
ReplyDeleteGenius! Thanks so much for this post.
ReplyDeleteSob. Beautiful. Just beautiful.
ReplyDeletegeeeeeeeniuus...
I'm literally sitting here with my mouth agape. It makes perfect sense, yet nobody's ever thought of it before!! Thanks, Fleegle!!!!!
ReplyDeleteGreat idea...brilliant in fact!
ReplyDeleteCan you explain why the colour change and the end-of-row aren't in the same spot? Does that mean you have to purl the stitches when you get past the end-of-row?
Thanks,
christina
Dear Troy and Christina--
ReplyDeleteIf you are knitting in the round on the same number of stitches, then the yarn will not travel. However, in this sample, there are yarnover increases in the corners, so when you knit back, there is an additional stitch from the increase to work.
Clever solution, thank you so much to share this!
ReplyDeleteYou can take it to the bank that the Green Woman and I will be first in line for your book!
ReplyDeleteVery Interesting! But I'm going to have to bookmark this and re-read it when my brain isn't so foggy!
ReplyDeleteZowee - this is great! I too don't mind purling until the row gets up to about 400 stitches and then the hands revolt. Thanks SO much for posting this.
ReplyDeleteLinda "K"
You are a freaking genius!!! I have been doing reverse stockinette instead of purling for the pullover I am working on. This will be so much easier now!
ReplyDeleteLOVE IT!
ReplyDeleteNothing short of brilliant! And while I generally don't mind purling, those long border rows in Queen Susan do give me pause...
ReplyDeleteFleegle
ReplyDeleteThis is not just a solution to a problem, but an elegant solution. To a geek, there is no higher praise.
I bow before genius.
Dee
Once again the perfect solution! I am in awe :-)
ReplyDeleteSWEET :)
ReplyDeleteBrilliant! I could have used it on my huge Shetland-style shawl that I had to frog because something cut an irreparable hole in it. Those purl rows were going to get very, very long! I will most definitely make use of this technique!
ReplyDeleteWhat an elegant solution to this pesky problem. I love it!
ReplyDeleteSo simple, so elegant, PURE GENIUS!
ReplyDeleteThanks!
Rosemary
ou're a wonderful mine of information... how on earth do you even know were to start with finding these things out... you revolutionize knitting!!!
ReplyDeleteVery, very clever. I've been thinking of a solution for the garter-in-round-problem for a while but I never thought about having 2 skeins. Love it!
ReplyDeleteI love you.
ReplyDeleteWow. The brilliant train must have missed my station and stopped at yours two or three times! That's awesome.
ReplyDeleteI'm confused. Isn't this just the same thing as wrap-n-turn you described earlier? I've done the garter thing by turning before.. very simple to do, but didn't do any wrap. I'll have to study this again (it's very confusing without pictures) and see what you are talking about.
ReplyDeleteThis would also work for socks with thin stripes, I think. Must experiment...
ReplyDeleteElegant solution, but purling every other row in circular knitting is good for you. It builds character and gives you curly hair and dimples.
ReplyDeleteThis is freakin' amazing!!! Now I want to knit everything in garter stitch, in the round.
ReplyDeleteI have been trying all kinds of things to avoid having to purl for the garter stitch on these market bags I'm making. This should be just the trick I need! Can't wait to try it. Thanks! :D
ReplyDeleteUtterly brilliant, and discovered just when I need it -- I'm knitting a Shetland edging, and will soon be knitting the borders inwards.
ReplyDeleteI have just been making two-row striped socks using Grumperina's helix technique (similar but with all the balls going in the same direction). This is absolutely brilliant! Even with that experience, I would never have thought of knitting the balls in opposite directions. Can't wait to try it. Thank you!
ReplyDeleteBrilliant! Thanks!
ReplyDeleteGreat idea! Thank you for sharing!
ReplyDeleteGENIUS!!!!!!!!!!!!!!!!!! Thank you for saving me hours of much-hated purling in the future!!!!!!!
ReplyDeleteThis is so clever.
ReplyDeleteI'm having the same issue with a swirl sweater I'm knitting, but it isn't garter stitch, it's 7 rows knit and 5 rows purl. The wrap and turn method isn't satisfactory. I'm wondering if you have a creative solution for me?
Once more (to echo another reader): what is OKO?
ReplyDeleteThanks for a great tip!
I infer that OKO is YO-k1--YO.
ReplyDeleteChristine, I takeit this is a welted type of thing. Could you not knit row 1 with ball one, row 2 with ball 2, etc...row 7 with ball 1, one wrap-and-turn, row 8 with ball 1, row 9 with ball 2, etc? You would basically just be switching which side is the knit side and knitting on that side until the next switch. One wrap and turn every 5-7 rows has got to be less noticeable than one every row!
Isn't there a big hole where you drop one ball and use the other?
ReplyDeleteBrilliant! You kept me guessing right up to the reveal. I have been thinking of making another shetland shawl and will certainly use your method when I do
ReplyDelete